
Step 0: Login to Amazon Web Console and Choose Redshift from Services:

Step 1: Choose you preferred AWS Zone. We have chosen Sydney. Now click on Launch a Redshift cluster:

Step 2: Cluster Details - Key in appropriate Cluster and Database Information :

The information entered is as follows:
| Field Name |
Value Entered |
| Cluster identifier* | cluster01 |
| Database name |
cluster01db01 |
| Database port* |
5439 |
| Master user name* |
master |
| Master user password* | Redshift123 |
| Confirm password* | Redshift123 |
Click Continue to proceed to the Node Configuration Page...
Step 3: In the Node Configuration page the default settings should match these values:
- Node Type: dc1.large
- Cluster Type: Single Node
- Number of Compute Nodes: 1

Click Continue to move to the Additional Configuration page...
Step 4: Additional Configuration:
In the Additional Configuration section, for the Cluster Parameter Group (if an option is available), select default.redshift-1.0. Otherwise, leave it at the default.

For the Encrypt Database option, select None.
The database does not need to be encrypted for this tutorial.
In the Configure Networking Options and optional settings sections make sure that the configuration matches the following:
- Choose a VPC: Default VPC(vpc- xxxxx)
- Cluster Subnet Group: default
- Publicly Accessible: Yes
- Choose a Public IP Address: No
- Availability Zone: no preference
- VPC Security Groups : default( sg-xxxxx )
- Create CloudWatch Alarm: No
Note You may safely ignore any permissions warnings you may see.
Step 5: Additional Configuration - Click Continue:
(You may be presented with a warning regarding pricing which you can ignore.)

Step 6: Review the settings of the cluster that you are about to launch. When you are ready to create the cluster, click the Launch Cluster button at the bottom of the screen.

The cluster may take a few minutes to generate.
Step 7: You can now view its status by clicking View your cluster on the Clusters dashboard. Otherwise you may select Close.

Step 8: cluster01 is the cluster created just now:

Configure Secure Client Access to an Amazon Redshift Cluster
With Amazon Redshift it is possible to query your database using third party client software. This will allow you to interact with your database with ease using SQL queries that are compatible with ANSI SQL and PostgreSQL.
Before you can connect the client, you will have to configure an AWS Security Group to allow traffic from that client to your Amazon Redshift cluster.
The client software used for this exercise is JackDB. It is a hosted service with a 14 day free trial that we can use .
In your web browser, open a new tab and go to https://www.jackdb.com.
Click START YOUR FREE TRIAL.
If you already have a JackDB account, log in to it and skip the next two steps.
Enter your details in the Sign up for JackDB page, and click Create an account.
Once you sign up confirmation mail will be sent to your email address.
Open the confirmation e-mail, click the link to activate your account, and then log in to your JackDB account.
Click the + Add a data source button in the top right of the main page.

Click Amazon Redshift to create a new data source.

You will now be brought to a connection creation page.
In the Security and Network section make a note of the IP address that JackDB will use to connect from.

Grant client access to your cluster
To allow client access to your Redshift databases you need to modify the Security Group to allow inbound TCP traffic on the port configured for your Redshift cluster from the ip-address that will be used by your client. This can be a range of addresses but in this lab we only need to provide access to a single IP address.
Return to the browser tab that is open on the AWS Console. On the Services menu, click EC2.

Click Security Groups.

Confirm that the default group is selected by clicking anywhere on the default security group row. You should only see one security group.
Click the Inbound tab, at the bottom of the screen.
Click Edit.
Click the Add Rule button to add an Inbound Rule (if needed).

For Type select Redshift. This sets the protocol to TCP and the Port Range to 5439, the default for Amazon Redshift.
For Source, select Custom from the drop-down list, and enter the JackDB Client™s origin IP address you obtained and noted down in the earlier step followed by /32 subnet suffix, eg.107.23.138.60/32.
Note that the IP address provided may be different to the example given.
Click Save.

Connect Client Software to an Amazon Redshift Cluster. Explore your cluster details:
Click Services and then Redshift to return to the AWS Redshift console page.
Once the cluster has been created and the Cluster Status indicates that the cluster is **available, then click the cluster name (the clickable link *cluster01**) to open it.
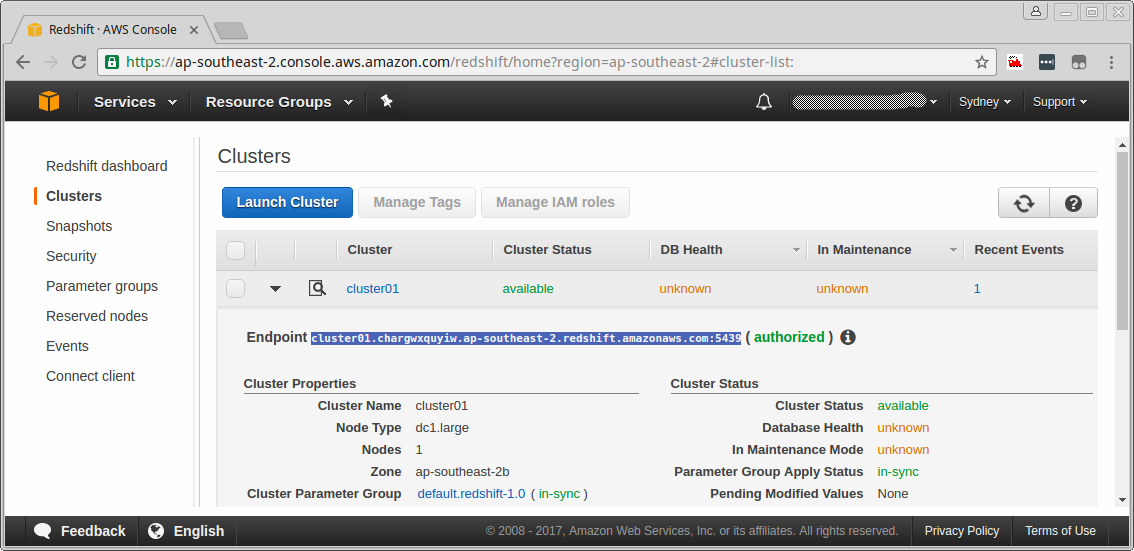
The clusters status can be viewed in the left navigational pane at any time during its creation by clicking on the Clusters menu item. The DB Health and In Maintenance fields may show an unknown state for a short period after the cluster is initialized. The cluster's details can be viewed by clicking on the cluster's name or by clicking the page details icon as shown below.
This will bring you into the Configuration tab. Within the Configuration tab you can view the Cluster Properties, Cluster Status, Cluster Database Properties, Backup, Audit Logging and Maintenance, Capacity Details and SSH Ingestion Settings of the cluster chosen.
Cluster Properties contains information about the Cluster including Name, Type, Node Type, number of Nodes, Zone location, Time and version of the creation as well as other information.
Cluster Status allows you to see the current status of the cluster whether it is available or not and also whether it is currently In Maintenance Mode.
Cluster Database Properties contains information on the Endpoint, which is the DNS address of the cluster, and the port number on which the database accepts connections. These are required when you want to create SQL connections. It also lets you know whether the cluster has a public IP address that can be accessed from the public internet. The JDBC URL and ODBC URL contain the URLs to connect to the cluster via a java database connection or an Oracle database connection client.
Backup, Audit Logging and Maintenance contains information on how many days the automated snapshots are retained, whether they are automatically copied to another region, and whether logging is enabled on the cluster.
Capacity Details contains information about the data warehouse node type, number of EC2 Compute Units per node, memory, disk storage, I/O performance as well as the processor architecture of the node type.
SSH Ingestion Settings contains information about the Public Key of the cluster as well as the Public and Private IP addresses of the node.
Locate the Endpoint for your database
The database Endpoint is the address of the database that we will use to configure the client.
In the Configuration tab, under Cluster Database Properties, find the Endpoint. The Endpoint will be required to connect the client to the database. Copy the Endpoint name and save it in a text file for use in the next section.
Configure your client database connection
Return to the browser tab that is open on the JackDB connection creation page.
Enter the data as displayed below for the new connection.

a. Title: Redshift Test Cluster01
b. Server (hostname or IP address): Paste in the Endpoint you recorded above, without the port number : cluster01.chargwxquyiw.ap-southeast-2.redshift.amazonaws.com:5439
c. Port number: 5439
d. Database Name: cluster01db01
e. Database user: master
f. Database password: Redshift123
Click Create this data source.
Then click Connect to this data source. If the connection was successful you be brought to the Data Sources page.

If an error occurs please check the following:
a. That the Endpoint is correct.
b. The port number is the correct and your system firewall is not blocking TCP port 5439.
c. That the Database name, Userid and Password are correct.
d. The Security Group inbound permissions have been configured correctly.
Load Sample Data into an Amazon Redshift Cluster
Create a test database table
After the connection has been established with JackDb, queries can be executed on the database. You will now execute SQL commands to create a table and import sample data.
Copy the SQL command below into the command screen.
create table users( userid integer not null distkey sortkey, username char(8), firstname varchar(30), lastname varchar(30), city varchar(30), state char(2), email varchar(100), phone char(14), likesports boolean, liketheatre boolean, likeconcerts boolean, likejazz boolean, likeclassical boolean, likeopera boolean, likerock boolean, likevegas boolean, likebroadway boolean, likemusicals boolean);
Click the Execute button above the SQL Command line windows to execute this SQL script.
The command should execute and display Executed Successfully in the result section below the query.

Load sample data from S3 into your test database table
Switch back to the JackDB tab on your system.
Delete the earlier SQL command line.
Copy the following SQL command SQL command window in JackDB.
copy users from 's3://awssampledbuswest2/tickit/allusers_pipe.txt'
CREDENTIALS 'aws_access_key_id=Access Key Id;aws_secret_access_key=Secret Access Key'
delimiter '|';
Copy the S3 link for the region you selected when launching the lab from the list below and use it to replace the S3 link in the SQL command in the JackDB command window. The S3 link is the green text in the command above. You can find the region in the upper right hand side of the AWS console between the awsstudent user name and the Support link if you did not record it earlier.
US East 1 (Northern Virginia): s3://awssampledb/tickit/allusers_pipe.txt
US West 2 (Oregon): s3://awssampledbuswest2/tickit/allusers_pipe.txt
EU West 1 (Ireland): s3://awssampledbeuwest1/tickit/allusers_pipe.txt
AP SouthEast 1 (Singapore): s3://awssampledbapsoutheast1/tickit/allusers_pipe.txt
AP SouthEast 2 (Sydney): s3://awssampledbapsoutheast2/tickit/allusers_pipe.txt
AP NorthEast 1 (Tokyo): s3://awssampledbapnortheast1/tickit/allusers_pipe.txt
In the JackDB command windows now replace the values for the Access Key Id and Secret Access Key that you saved in the previous section. These are the two items of red text items in the SQL command.
Click the Execute button again to execute the SQL command.
Note: It may take a few moments to execute the command. If successful it will report:
Executed Successfully
Updated 0 rows in xx.xxx seconds
The copy command will not report the number of table rows that have been imported in this lab with this client. If the command does not execute correctly please ensure that command is modified as stated above with your own lab access key values and retry. The command should look something like this:

Query an Amazon Redshift Database From an External Client
Execute SQL queries against your test database
Now that you have data in your Redshift database you can query the data using SQL select statements and queries. Note that these are just sample queries to demonstrate that standard SQL commands work.
Delete the previous query from the SQL command window and enter the following command:
SELECT * from users;
Click the Execute button again to execute the SQL command.

This style of query, which returns all columns, is not recommended for Redshift since it is a columnar database that is designed for queries that restrict the columns in the query and result. The command syntax is still valid and functions correctly however.
Delete the previous query from the SQL command window and enter the following command to see the results:
SELECT userid,firstname,lastname,city,likesports from users where likesports = 'true' order by firstname;

Click the Execute button again to execute the SQL command.
We have been able to successfully load data from S3 bucket into Amazon Redshift!!
Let us have a look the properties of our Amazon Redshift Cluster Endpoint:

We can now sign out of our Amazon Web Services Console:

Thanks for sharing useful information.. we have learned so much information from your blog..... keep sharing
ReplyDeleteRedShift Training
AWS RedShift Training
Amazon RedShift Online Training
A data mart is a subset of a Data Warehouse Service . A data mart is used to analyze data that is unique to a specific business unit or business process. It serves as a separate copy of the data warehouse for a specific function or functional area. A data mart usually contains a subset of the data in a warehouse, but it may contain additional tables and data not found in the data warehouse. A data warehouse can have multiple data marts associated with it.
ReplyDeleteHey, thanks for the blog article.Really thank you! Great.
ReplyDeleteMuleSoft training
MuleSoft online training